
How to Build a Telegram Mini App with Telegram Serverless
Learn how to build, host and deploy a Telegram Mini App using Telegram Serverless, HTML, JavaScript, Vite and the tgcloud CLI. Includes setup, backend endpoints, database basics, AI-assisted development and live chat integration.
How to Build a Telegram Mini App With Serverless: A Practical Guide
Telegram Mini Apps let you build web applications that run inside Telegram. With Telegram Serverless, you can host your frontend, run backend endpoints and store data without managing your own server infrastructure.
But building a Mini App involves more than getting the code to run. You also need to think about what happens after users start using it. They will ask questions about features, payments, accounts and errors. Without a way to answer those questions, you may end up handling every request manually.
This guide explains how to build and deploy a Telegram Mini App using Serverless, including the tools you need, the development process, common problems and how to provide AI-powered support with LaPoe.
What You Need
Before starting, prepare the following:
A computer: You'll use it to develop and deploy your application.
Node.js 18 or later: Required for the development tools.
A code editor: VS Code is a common choice.
A Telegram account: You'll use it to create and configure your bot.
A Telegram bot: Create one through @BotFather.
Telegram Serverless access: You'll need the Serverless CLI access token from BotFather.
An AI coding agent: Useful if you want AI to help build the application.
Your Mini App idea: Decide what users should be able to do.
LaPoe: For adding an AI assistant that answers users' questions inside your Mini App.
Quick Start: Build and Deploy
Here is the overall process:
Create a Telegram bot through BotFather.
Set up the project using
npm create @tgcloud/bot ..Authenticate using
npx tgcloud login.Build the frontend users will see.
Create Serverless endpoints for backend operations.
Set up a database if your application needs persistent data.
Build and deploy the project.
Configure the deployed URL in BotFather.
Test the application inside Telegram.
Integrate LaPoe Miniapp chat to provide AI-powered answers and support for your users.
The sections below explain each step.
1. Understand Telegram Serverless
A traditional Mini App often requires separate frontend hosting and a backend server. Telegram Serverless brings these capabilities together.
It provides:
Frontend hosting: Serves the built Mini App files.
Backend endpoints: Runs server-side code when your application needs it.
Database support: Stores application data.
Telegram integration: Makes verified Mini App initialization data available to backend code.
Serverless handles infrastructure, but you still need to build your application's interface, implement its business logic and protect its data.
You should also plan how users will get help when they encounter problems. A working Mini App can still generate a significant support workload if users cannot find answers to common questions.
LaPoe provides an AI assistant that can answer questions using your knowledge base and assistant configuration. With LaPoe Miniapp chat, you can embed that assistant directly into your Mini App, giving users a place to ask questions without leaving the application.
2. Create Your Telegram Bot
Open @BotFather in Telegram.
Send
/newbot.Enter a display name.
Choose a unique username ending in
bot,app,gameoragent.Save the bot token securely.
You'll use BotFather later to configure how users open your Mini App.
Important: The bot API token and the Telegram Serverless CLI access token are different credentials. Do not use one in place of the other.
3. Set Up Your Serverless Project
Open a terminal in the directory where you want your project to live.
Run:
npm create @tgcloud/bot .
This command adds Telegram Serverless support to the project. It is designed to preserve existing files rather than overwrite them.
Next, authenticate:
npx tgcloud login
Follow the instructions to obtain and use the Serverless CLI access token from BotFather.
Check your authentication and project status:
npx tgcloud status
Resolve any reported errors before continuing.
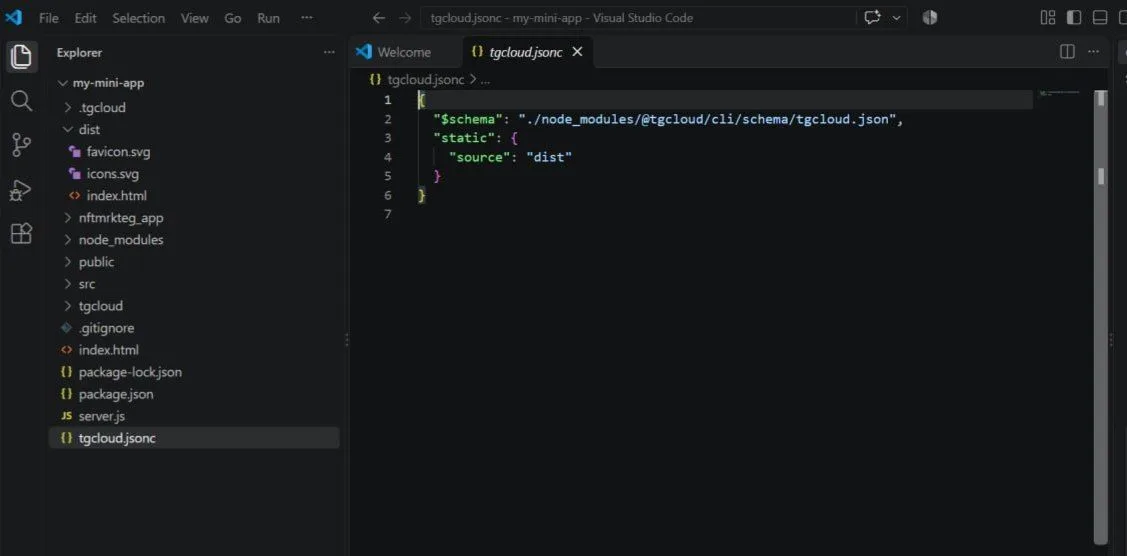
Configure Frontend Hosting
Serverless uses tgcloud.jsonc to identify resources such as your static frontend files.
For a Vite project that builds into dist, the configuration can look like this:
{ "$schema": "./node_modules/@tgcloud/cli/schema/tgcloud.json", "static": { "source": "dist" } }
The source value must match your actual frontend build output directory. Other frameworks may require different configuration.
4. Build the Mini App Frontend
The frontend is the interface users see when they open your Mini App. It could be a store, dashboard, game, booking system or another web application.
Telegram provides a JavaScript SDK for Mini Apps. Include it in your HTML page:
<script src="https://telegram.org/js/telegram-web-app.js?64"></script>
You can then access Telegram's Web Apps API through Telegram.WebApp.
For example:
const webApp = window.Telegram?.WebApp; if (webApp) { webApp.ready(); const user = webApp.initDataUnsafe?.user; if (user) { console.log(Hello, ${user.first_name}); } }
This example demonstrates reading profile information in the frontend.
When your application needs trusted identity information, validate Telegram's initialization data on the backend or use the verified context provided by Serverless.
Build the Frontend
For a Vite project, run:
npm run build
This generates production files, commonly in the dist directory.
Important: npx tgcloud push deploys configured resources but does not automatically build the frontend. Build it first or use a project deployment script that performs the build before pushing.
5. Add a Backend Endpoint
Backend endpoints handle operations that should not run exclusively in the user's browser, such as retrieving protected information or saving application data.
Create an endpoint:
npx tgcloud add endpoints/getProfile
This creates:
tgcloud/endpoints/getProfile.js
A basic example:
export default async function (input, ctx) { const user = ctx.initData.user; return { id: user.id, firstName: user.first_name }; }
This endpoint returns profile information from the verified Mini App context supplied to it.
The example assumes ctx.initData.user is available. Handle missing data and errors appropriately in a production application.
Call the Endpoint From the Frontend
Telegram.WebApp.Serverless.call( "getProfile", {}, function (err, profile) { if (err) { console.error("Could not load profile:", err.message); return; } console.log(profile); } );
The first argument is the endpoint name, the second is its input and the callback receives either an error or the returned result.
Use the same pattern for endpoints that retrieve records, save settings or perform other backend operations.
6. Add a Database
If your Mini App needs to remember information between sessions, you can use the database provided by Serverless.
Examples include user preferences, orders, saved items and application settings.
Start by defining your database schema in the project's schema file, typically:
tgcloud/schema.js
Use the current Serverless documentation and generated project examples to determine the supported schema syntax for your installed version.
Deploy the configured resources:
npx tgcloud push
Then apply database migrations:
npx tgcloud migrate
Deploying the schema and applying migrations are separate steps. When you change the schema, follow the migration workflow required by your CLI version.
7. Deploy Your Mini App
Build the frontend:
npm run build
Then deploy:
npx tgcloud push
If your project generated a deployment script that builds the frontend and pushes the configured resources, you can use that instead. Inspect package.json to confirm what the script does.
After deployment, the CLI should provide your hosted application URL. Follow the instructions printed by your installed CLI version.
A successful deployment does not guarantee that the frontend was built correctly. Verify that the deployed version contains your latest changes.
8. Connect the Mini App to Telegram
Open BotFather and configure the deployed URL as your bot's Mini App.
Depending on your intended experience, you can configure it as the main Mini App or through the bot's menu button.
Use the exact URL provided by the deployment process.
Then open your bot in Telegram and launch the application.
Why Browser Testing Is Not Enough
Your frontend may load successfully in a regular browser while Telegram-specific functionality fails.
For example, an endpoint that requires verified Telegram initialization data may not work when you open the frontend through a local development URL.
Use a local browser to debug the interface, but test Telegram-specific functionality by launching the deployed application through Telegram.
9. Test the Complete Application
Before releasing your Mini App, check the following.
Frontend
Does the application load without errors?
Do buttons, forms and navigation work?
Does the deployed version reflect your latest changes?
Backend
Can the frontend call each endpoint?
Are errors handled correctly?
Are inputs validated and permissions enforced?
Database
Can the application save and retrieve records?
Do migrations complete successfully?
Can users access only the data they are authorized to see?
Telegram
Does the Mini App open from the correct bot?
Does Telegram initialization work?
Does the backend receive the expected verified context?
User support
Can users find answers to common questions?
Is there a clear way to ask for help when the AI cannot resolve a question?
Have you tested the support experience inside the deployed Mini App?
Common Problems
Frontend changes don't appear after deployment. Build the frontend before pushing and check that tgcloud.jsonc points to the correct output directory.
The CLI rejects the login. Check that you're using the Serverless CLI access token rather than the bot API token.
An endpoint fails in a local browser. Check whether it requires Telegram initialization data. Test through the deployed Mini App launched in Telegram.
The app opens, but data doesn't load. Inspect the browser console, endpoint error and backend logic. Confirm that the endpoint name matches the name used in the frontend.
Database changes aren't reflected. Check whether you've deployed the updated schema and applied the required migrations.
Identify which layer is failing before rewriting the entire project.
10. Build With an AI Coding Agent
You don't have to write every line of code yourself. An AI coding agent can help create the frontend, add endpoints, configure the database and investigate deployment errors.
You'll still need a computer because the agent must work with project files, development tools and the deployment environment.
How to Work With the Agent
Describe the application you want to build.
Ask the agent to inspect the current Serverless documentation and your project structure.
Have it implement one working feature at a time.
Ask it to explain the files and commands it changes.
Test each feature before adding more complexity.
Deploy and test the application inside Telegram.
Ask the agent to investigate specific errors instead of making unrelated changes.
Copy-and-Paste Prompt
I want to build a Telegram Mini App using Telegram Serverless.

**My app idea:** [Describe what you want the application to do.]

Help me build the application, including its frontend, backend endpoints and database if required.

Before writing code:


1. Read the current official Telegram Serverless and Telegram Mini Apps documentation.

2. Inspect my existing project and preserve working code.

3. Explain the architecture and identify the files that need to be created or modified.

4. Verify commands and configuration against the documentation for the installed CLI version.


Work through the project in stages:


1. Set up the project and authenticate the Serverless CLI.

2. Build the frontend and configure its production output.

3. Implement the application features.

4. Create backend endpoints where needed.

5. Add a database and migrations if persistent data is required.

6. Deploy the application and explain how to configure its URL in BotFather.

7. Test the deployed Mini App inside Telegram.

8. Integrate LaPoe Miniapp chat so users can ask questions and get answers inside the application. Follow LaPoe's current setup instructions and configure the correct domain.


Work one stage at a time. Run available checks, explain what each command does and investigate errors before proceeding. Never claim a feature works unless it has been tested. If I need to log in, provide a token or change a setting in BotFather, explain exactly what I need to do without asking me to expose private credentials.

At the end, summarize what works, what remains unfinished and how to deploy future changes.
11. Integrate LaPoe Miniapp Chat
Once your Mini App is deployed, the next challenge is supporting the people who use it.
Users may ask how a feature works, how to complete a purchase or what to do when something fails. If every question requires a personal response, support can become a bottleneck as your user base grows.
LaPoe Miniapp chat lets you embed an AI assistant in your Mini App using a script tag. The assistant uses your LaPoe knowledge and configuration, and conversations are available in your LaPoe dashboard.
Step 1: Set Up Miniapp Chat
Open your LaPoe dashboard and go to Miniapp chat.
Add a site and configure the domain where the chat widget will appear. Each site has its own installation snippet.
Step 2: Configure Allowed Domains
Enter every domain where you intend to use the widget.
LaPoe checks the allowed domains before loading the chat. This helps prevent someone from copying your snippet and using it on an unrelated website.
Make sure the configured domain matches your deployed Mini App URL.
Step 3: Install the Widget
Copy the installation snippet from your dashboard and place it before the closing </body> tag on the page where the chat should appear.
The snippet follows this pattern:
<script src="https://lapoe.app/widget.js" data-lapoe-key="YOUR_LAPOE_KEY" defer> </script>
Replace YOUR_LAPOE_KEY with the key generated in your dashboard. Use the actual snippet provided by LaPoe when installing the widget.
If your Mini App uses a frontend framework, add the script through the appropriate HTML template or integration method. Confirm that the script loads in the deployed application.
Step 4: Customize the Experience
From the LaPoe dashboard, you can configure:
Chat title, logo and accent colour
Launcher position and text
A short message above the launcher
Home screen headline and links
Welcome message and suggested questions
Which assistant handles conversations
Whether visitors can request a person
Use these settings to make the support experience consistent with your Mini App.
Step 5: Enable Human Handover
Some questions need personal attention. Enable the option that allows visitors to request a person when appropriate.
Your team can receive an alert and review conversations in the LaPoe Inbox. Business hours and away messages can also be configured.
Step 6: Control the Widget With JavaScript
LaPoe provides JavaScript controls for opening, closing and resetting the chat:
LaPoe.open(); LaPoe.close(); LaPoe.reset();
LaPoe.open()opens the chat.LaPoe.close()closes the chat.LaPoe.reset()resets the conversation state.
If your Mini App lets users sign out or switch accounts, reset the widget when appropriate. Browsers may remember a visitor's conversation, so take care not to expose one user's conversation to another user on a shared device.
Step 7: Test the Integration
After deploying:
Open your Mini App through Telegram.
Confirm that the chat widget appears.
Ask a question covered by your knowledge base.
Check that the conversation appears in your LaPoe dashboard.
Test the appearance settings and human handover options you've enabled.
Confirm that the widget does not load on domains that aren't allowed.
You can also check installation activity in your dashboard.
Official Documentation
For the latest commands, configuration options and supported features, consult:
CLI commands and configuration can change between versions. Check the documentation for your installed version when a command or feature behaves differently from the examples in this guide.